Skew correction
Software based skew correction can help resolve dimensional inaccuracies resulting from a printer assembly that is not perfectly square. Note that if your printer is significantly skewed it is strongly recommended to first use mechanical means to get your printer as square as possible prior to applying software based correction.
Print a Calibration Object
The first step in correcting skew is to print a calibration object along the plane you want to correct. There is also a calibration object that includes all planes in one model. You want the object oriented so that corner A is toward the origin of the plane.
Make sure that no skew correction is applied during this print. You may
do this by either removing the [skew_correction] module from printer.cfg
or by issuing a SET_SKEW CLEAR=1 gcode.
Take your measurements
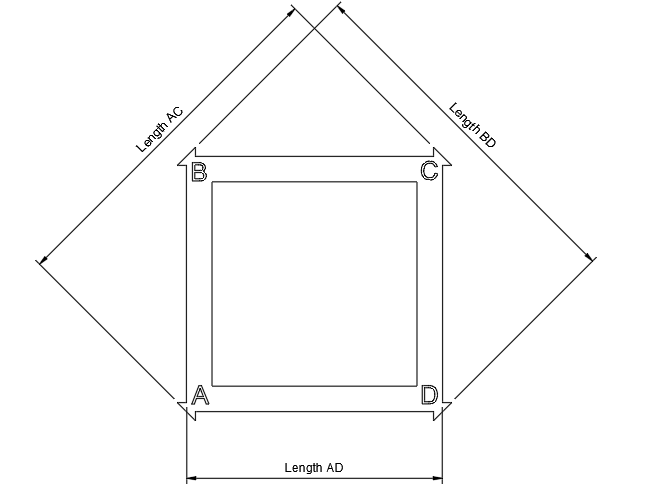
The [skew_correction] module requires 3 measurements for each plane you want
to correct; the length from Corner A to Corner C, the length from Corner B
to Corner D, and the length from Corner A to Corner D. When measuring length
AD do not include the flats on the corners that some test objects provide.
Configure your skew
Make sure [skew_correction] is in printer.cfg. You may now use the SET_SKEW
gcode to configure skew_correction. For example, if your measured lengths
along XY are as follows:
Length AC = 140.4
Length BD = 142.8
Length AD = 99.8
SET_SKEW can be used to configure skew correction for the XY plane.
SET_SKEW XY=140.4,142.8,99.8
You may also add measurements for XZ and YZ to the gcode:
SET_SKEW XY=140.4,142.8,99.8 XZ=141.6,141.4,99.8 YZ=142.4,140.5,99.5
The [skew_correction] module also supports profile management in a manner
similar to [bed_mesh]. After setting skew using the SET_SKEW gcode,
you may use the SKEW_PROFILE gcode to save it:
SKEW_PROFILE SAVE=my_skew_profile
After this command you will be prompted to issue a SAVE_CONFIG gcode to
save the profile to persistent storage. If no profile is named
my_skew_profile then a new profile will be created. If the named profile
exists it will be overwritten.
Once you have a saved profile, you may load it:
SKEW_PROFILE LOAD=my_skew_profile
It is also possible to remove an old or out of date profile:
SKEW_PROFILE REMOVE=my_skew_profile
After removing a profile you will be prompted to issue a SAVE_CONFIG to
make this change persist.
Verifying your correction
After skew_correction has been configured you may reprint the calibration
part with correction enabled. Use the following gcode to check your
skew on each plane. The results should be lower than those reported via
GET_CURRENT_SKEW.
CALC_MEASURED_SKEW AC=<ac_length> BD=<bd_length> AD=<ad_length>
Caveats
Due to the nature of skew correction it is recommended to configure skew
in your start gcode, after homing and any kind of movement that travels
near the edge of the print area such as a purge or nozzle wipe. You may
use use the SET_SKEW or SKEW_PROFILE gcodes to accomplish this. It is
also recommended to issue a SET_SKEW CLEAR=1 in your end gcode.
Keep in mind that it is possible for [skew_correction] to generate a correction
that moves the tool beyond the printer's boundaries on the X and/or Y axes. It
is recommended to arrange parts away from the edges when using
[skew_correction].